#How to Disable UAC in Windows 10
Explore tagged Tumblr posts
Visit Tumblr Blog
Explore Tumblr blogs with no restrictions, modern design and the best experience.
Last Seen Tumblr Blogs


Fun Fact
The “We are the 99%” Tumblr blog became the slogan for the Occupy Wall Street movement.
Text
Alright. I'm making this post because I was unpleasantly surprised to find Microsoft had forcibly downloaded an """"ai assistant"""" onto my computer (called Copilot), and because finding a site that actually told me how to kill it for good -- in clear, truly step-by-step terms -- was way harder than it needed to be.
Preface: this is only relevant if you're running Windows 11.
Here is your target:

If you see this logo on your taskbar -- or... have Edge installed on Windows 11 -- you've got Copilot. You can't delete it on its own, Microsoft has integrated it into the OS as best they can. The most you can do is disable it (instructions for which are at the very end of this post).
So... to REALLY get rid of it you need to uninstall Microsoft Edge, because it's a part of/reliant on Edge. A lot of bells and whistles of Windows are also reliant on Edge, like widgets, but I never use those. I use my PC almost exclusively for gaming, and I don't want this slimy "ai" shit on my computer. I use Firefox anyway. Edge can go die as far as I'm concerned.
Here's the actual steps, copy-pasted from a website that took me way too long to find. It also really makes my browser chug for some reason, which is why I'm copy-pasting the whole thing. If you still want to look at the site itself, put it in reader view as fast as you can (link to site).
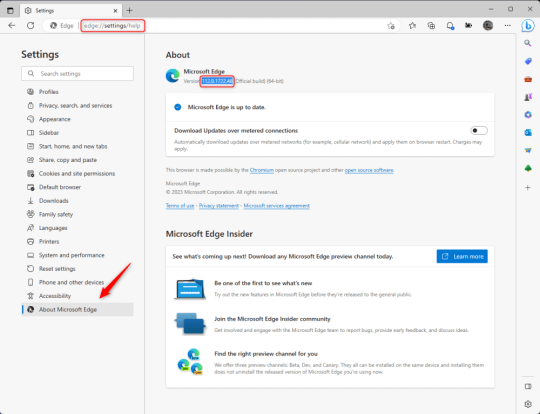
1.) Open Microsoft Edge, type "edge://settings/help" in the address bar, and then press Enter.
2.) Click "About Microsoft Edge" at the bottom of the left-hand pane. Copy the version number at the top of the screen, under Microsoft Edge.
3.) Press Windows Key + S to open Windows Search.
4.) Type "Command Prompt", right-click the result, and then select "Run as Administrator".
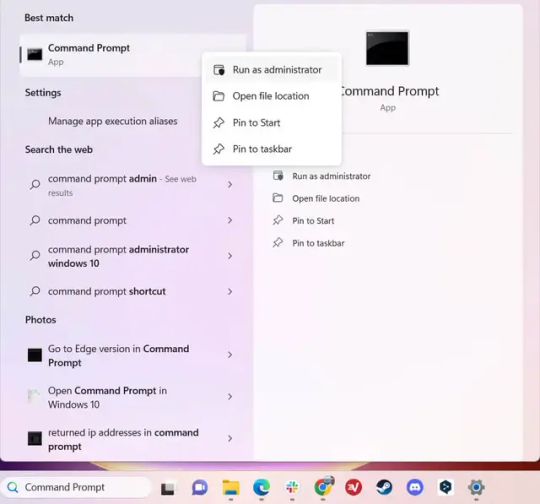
5.) The User Account Control (UAC) prompt will appear. Click "Yes".
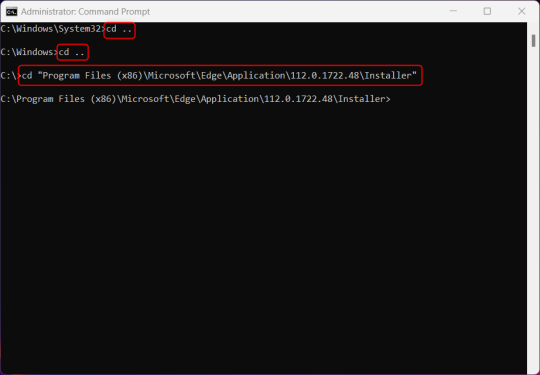
6.) Navigate to Edge’s “Installer” directory by using the cd command. Depending on which directory your Command Prompt opens in by default, you may need to use the "cd .." command to go back a level or two.
Once ready, run this command:
cd “Program Files (x86)\Microsoft\Edge\Application\Version Number\Installer”
Replace "Version Number" with your actual version number copied earlier.
7.) Next, run this command to uninstall Microsoft Edge:
setup –uninstall –force-uninstall –system-level
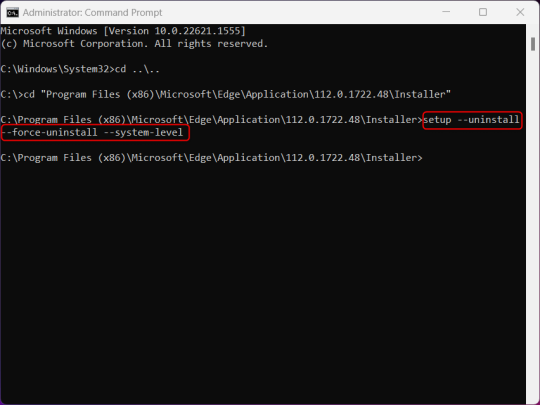
((It will look like nothing happened! Don't worry!))
8.) Restart your PC for the changes to take place.
((HOWEVER, Windows will try to reinstall it the next time your PC updates (or whenever it feels like it lol) so there's a second half to this))
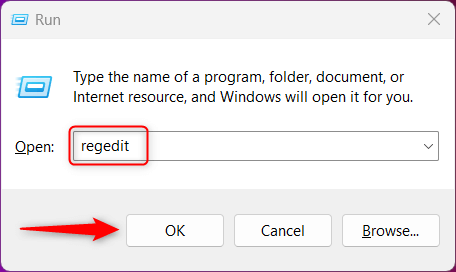
1.) Press Windows Key + R to open Run.
2.) Type "regedit" in the text box and click OK to open the Registry Editor.
3.) The User Account Control (UAC) prompt will appear. Click "Yes".
4.) In the Registry Editor, navigate to HKEY_LOCAL_MACHINES\SOFTWARE\Microsoft.
5.) Right-click the "Microsoft" folder, hover your cursor over "New", and then select "Key".
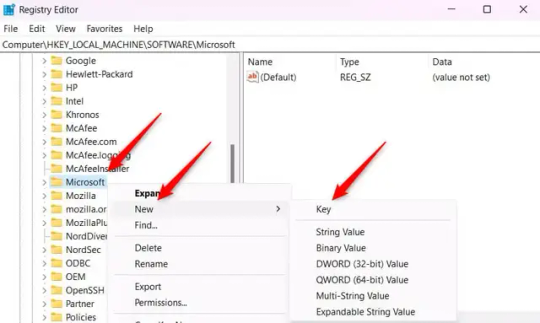
6.) Rename the new Key to "EdgeUpdate".
7.) Right-click EdgeUpdate, hover your cursor over "New", and then select "DWORD (32-bit) Value".

8.) Right-click the new value, which is currently named "New Value #1".
9.) Select "Rename" from the context menu.
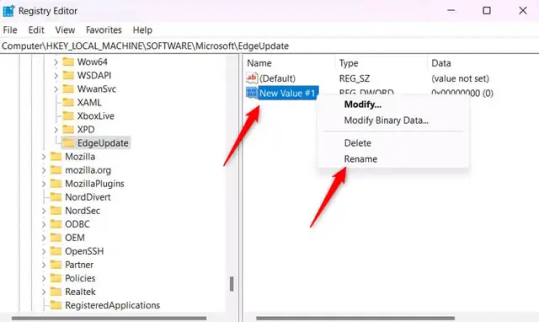
10.) Rename the value to "DoNotUpdateToEdgeWithChromium".
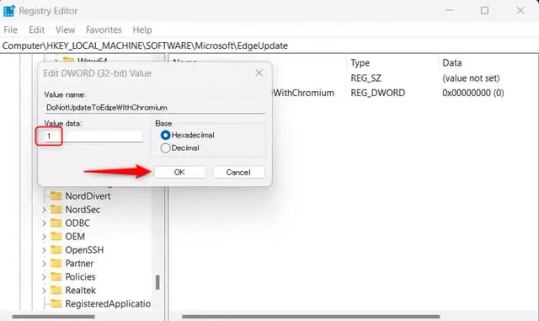
11.) Right-click the newly-named DoNotUpdateToEdgeWithChromium value and select "Modify" from the context menu.
12.) The Edit DWORD (32-bit) Value window will appear. Change the Value data to "1" and then click OK.
((You are now free. If you ever run into a really serious, unavoidable issue with your OS that's clearly a result of Edge being gone, you can redownload it like a regular app. But you should be fine.))
((And, if for some reason you want still want Edge around but just want the copilot thing gone, here's what you do:
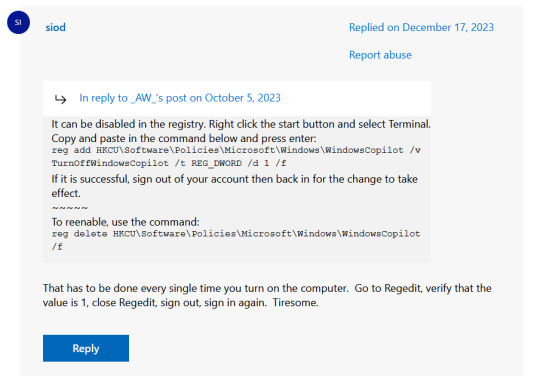
The command, for ease of copy-pasting: reg add HKCU\Software\Policies\Microsoft\Windows\WindowsCopilot /v TurnOffWindowsCopilot /t REG_DWORD /d 1 /f
You can't actually truly delete Copilot (without deleting Edge), only disable it. And as the reply says, you do have to do this every time you turn the computer on. I haven't tested that myself, but I believe it. I assume/hope that excludes just waking the computer up after it goes to sleep, but I don't know for sure.))
120 notes
·
View notes
Text
IObit Uninstaller 13.6 Pro Key License [1Yr Free 2024]
What is IObit Uninstaller 13.6 Pro Key?
The IObit Uninstaller 13.6 Pro key is a license key that unlocks the full capabilities of IObit Uninstaller 13.6 Pro. This key grants access to advanced features and tools designed to help you efficiently manage and remove unwanted software from your computer. Unlike the free version, the Pro version offers enhanced functionalities for a more comprehensive cleaning experience.
What is IObit Uninstaller 13.5 Pro Key?
The IObit Uninstaller 13.5 Pro key serves a similar purpose for the previous version, IObit Uninstaller 13.5. It provides access to Pro features in that version, allowing for advanced uninstalling capabilities and better system optimization compared to the free version.
Features of IObit Uninstaller 13.6 Pro Key
Advanced Uninstallation: Completely removes unwanted software, including residual files and registry entries.
Browser Toolbar Removal: Easily eliminates unwanted browser toolbars and plugins.
Real-Time Monitoring: Monitors installations in real-time to ensure complete removal.
Powerful Scanning: Performs a deep scan to clean up leftover files and registry traces.
Batch Uninstall: Allows multiple programs to be uninstalled simultaneously.
How to Activate IObit Uninstaller 13.6 Pro Key with License Keys?
Download and Install: First, download and install IObit Uninstaller 13.6 from the official website.
Launch the Software: Open IObit Uninstaller 13.6 Pro on your computer.
Enter License Key: Navigate to the registration or activation section within the software.
Input Key: Enter your IObit Uninstaller 13.6 Pro key in the provided field.
Activate: Click the activation button to unlock Pro features.
How to Uninstall IObit Uninstaller?
Open IObit Uninstaller: Launch the application from your applications or start menu.
Select Program: Choose IObit Uninstaller from the list of installed programs.
Uninstall: Click the uninstall button and follow the prompts to remove it from your system.
Clean Residual Files: Use any built-in cleanup tools to ensure all associated files are deleted.
IObit Uninstall and Remove Administrator Issues on Windows 10
If you encounter administrator issues while uninstalling IObit Uninstaller on Windows 10:
Run as Administrator: Right-click the IObit Uninstaller icon and select “Run as administrator.”
Disable UAC: Temporarily disable User Account Control (UAC) if you continue to face issues.
Use Safe Mode: Boot your computer in Safe Mode and try uninstalling the program again.
Use an Uninstaller Tool: Consider using another uninstaller tool if the built-in method fails.
Why Choose IObit Uninstaller 13.6 Pro Key?
1. Comprehensive Removal: Provides thorough uninstallation to eliminate all traces of unwanted programs.
2. Enhanced Performance: Improves system performance by removing clutter and optimizing the registry.
3. User-Friendly: Offers an intuitive interface for easy navigation and operation.
4. Real-Time Monitoring: Ensures clean installations and removals with real-time monitoring.
IObit Uninstaller 13.6 Pro Key Free License 2024
6E25C-21F89–7F62B-D86BC for 13.6.0.5– Valid till — October 16, 2024.
Free License: 11242-C437D-DE013–6E6TC
New License: DB978–6E333-B12DC-7BDTC
Key: F6741-F743C-7CE93–3C8TC (Valid till June 20, 2024)
30C81–393A2–7DBAF-390TC — Valid till — November 8, 2024
6E25C-21F89–7F62B-D86BC — Valid till — October 16, 2024
F6741-F743C-7CE93–3C8TC — Expiry: June 20, 2024
11242-C437D-DE013–6E6TC — Expiry: May 30, 2024
DB978–6E333-B12DC-7BDTC
11242-C437D-DE013–6E6TC
BE75C-BD2C8–7E065–3FEBC (Valid till Apr 08, 2024)
5E635-B9223-D6779-BAEBC (Valid till Mar 22, 2024)
539C6-A60A4–62290–383TC (Valid till Mar 02, 2024)
6B95D-3EE8D-ED01B-2DDTC (Valid till Mar 02, 2024)
4AEC4-DAE7D-A0C86–765TC (Valid till Mar 02, 2024)
B894E-7ADF2–100F1-CC1TC (Valid till Mar 02, 2024)
539C6-A60A4–62290–383TC (Valid till Mar 02, 2024)
7B48B-01241–1EE02–3BETC (Valid till Feb 18, 2024)
7A54B-0A8ED-8F770–4ECTC (Valid till Feb 09, 2024)
2CBB7–715F7–9E5BE-991TC (Valid till Feb 09, 2024)
IObit Uninstaller 13 ProLicense Key (3 Device)
CDNJF-P6G3P-85BQV-58Y7E
4MM6R-R9332–4JKKJ-X3N46
Q9DHY-5367H-YYVLN-JGW5U
M3JFE-7MNWQ-MM59G-K5WXY
QKSUD-GEZRM-JVNER-K2EGP
Z3XSZ-6PVNJ-YNN8J-ZRPRX
IObit Uninstaller Pro Activation codes (6 Months)
B894E-7ADF2–100F1-CC1TC
81B57-E0F9E-14836–570BC
C7870-A6BBE-D9C12-A25TC
CE697–12E0B-46B82-AE4TC
FE17F-ADE45–6BED8–30DTC
879BF-5A984–8EEB0–86ETC
4BCDA-6B1CC-3AC6F-AD4TC
Conclusion
IObit Uninstaller 13.6 Pro Key is a powerful tool designed to help you manage and remove unwanted software effectively. With advanced features like real-time monitoring and deep scanning, it ensures a thorough cleaning process. To activate the Pro version, simply use the provided license key, and for any issues, follow the suggested solutions to uninstall or troubleshoot.
0 notes
Text
What Is UAC in Windows 10 and How to Disable It ?
What Is UAC in Windows 10 and How to Disable It ?

What Is UAC in Windows 10 and How to Disable It?
If you have a network of computers in your home or workplace, you need to control which users or applications can change something on that system.
One way to prevent unauthorized changesis to designate one person as the network administrator. However, having one person managing everything is not enough, and this is where User Access Control (UAC)…
View On WordPress
#How to Add a Family Member to Your Microsoft Account#How to Disable UAC in Windows 10#Take Control of Your Accounts#What Is UAC in Windows 10 and How to Disable It
0 notes
Text
Game Instalation Guide:installing the sims castaway stories on your machine
Introduction
Hello! I’m Luca and welcome (back) to my tumblr! Recently i became addicted to the sims castaway stories so i decided that today i’m gonna show you how to install The Sims Castaway Stories on your machine! (and also make it to work)
DISCLAMER
i think we all know what is this game! So i won’t talk about it today! lil’ disclamer:The Sims Castaway Stories’s pc version is laptop frendly so it can run well on laptops but of course it has problems running on modern systems! However we will make the game to work on windows 10 so don’t worry!
BEGINNING
Before we begin please disable your antivirus! And you will also need a tool for extracting .zip or .rar files! You can get Winrar or 7-Zip,it dosen’t matter that much! Tho i recommend using 7-Zip because it’s free :D
1.Go to https://oldgamesdownload.com/the-sims-castaway-stories/ and go to the download the sims castaway stories then select the purple button,Should look like below:

2.After that,select how would you like to download castaway stories! You have to options: mega.org or archive.org,it dosen’t matter which one you select.

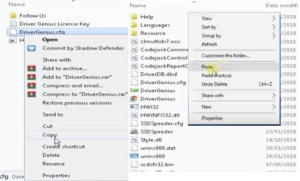
3.(7-ZIP USERS) After it finished downloading select the archive and right-click on it and then select open with,scroll down to the bottom and select look on another app on this pc then go to C:\Program Files\7-zip then select 7zFM.exe ,for 32 bit systems it should be the same default location or Program Files (x86)
(WinRAR USERS) You can do the same process but select the default location for winrar UNLESS it’s already set as default.
4.Continuing,after that open the archive then select its content and paste it into a new folder.
5.After it finished the extracting procces make sure your antivirus is disabled because if it is enabled the crack is going to be detected as a virus and will get removed,then add the folder with the game’s setup to the exceptions list (just to be safe <3)
6.Open the setup and if you get a pop-up from UAC(user account control) saying:an admin has blocked you from running this app, follow this tutorial: https://www.youtube.com/watch?v=1jgwD2e1MB8&ab_channel=TreeAcademy
7.Open the setup again and follow the on-screen instructions,when a serial code is required use this: N78Q-RZKW-7428-DB09-DVTY then select the directory you want to install the game then let the installer do its job,after it got finished select quit then finish.
8. You can enable UAC again now,also add the game’s installation directory to your exceptions,For Windows Defender go to Virus&treat protection > Virus&Treat Protection settings then select manage settings then scrol down to add or remove exclusions and then select the game’s folder,the default is C:\Program Files or Program Files(86)\EA Games\The Sims Castaway Stories
9.Go to the crack folder then select the files inside them and copy them to the game’s folder mentioned above then go into the tsbin folder and right click and select paste. CONGRATS! THE GAME IS FULLY INSTALLED BUT WE AIN’T FINISHED YET!
Optimizing the game!
1. We will need GRM (graphic rule maker) and ONLY IF YOU HAVE 8 GB OF RAM OR MORE we will use 4 gb patch. Download GRM here and 4 gb patch here
2.I’m gonna assume that you know how to install GRM and continue.After the tool got installed open it and it should look like this:
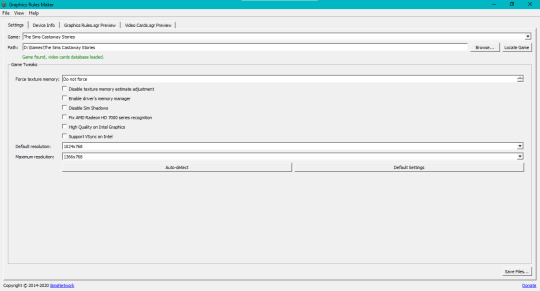
3.Select the game from the game list and then select the locate game button and if it dosen’t detect it select browse.. and select the game’s location.
4.Based on your GPU you need to force the texture memory or the game won t work,go to the search button (for windows 10) and search advanced display info and then scroll down and select Display Advanced Proprieties for Display 1 or 2,a window should open and you need to look at the dedicated video memory and the amount of vram that you see there is the amount that you will enter in the force texture memory section.
5.Select the disable sim shadows option and if you have an amd gpu select the fix amd radeon hd series option,then select your resolutions then save the files,select yes and then ok and you are done!
6.Open the 4gb patch and select the SimsCS.exe file from the tsbin sub-folder of the game’s directory.
Now you are done optimizing the game! You can right click on the SimsCS.exe and select send to desktop(create shortcut)
The game should work now,if you have any questions please ask them in the ask me anything section! Enjoy!
20 notes
·
View notes
Text
Iso Windows 7 For Mac

Iso Windows 7 For Macbook Pro
Download Iso Image Windows 7 For Mac
Windows 7 Iso For Virtual Machine
Buy Windows 7 For Mac
And all my files got deleted so I decided to do a clean Windows 7 install. But unfortunately, at that time I was not having any copy of the Windows 7 DVD to install it. So I borrowed it from my friend and then install it on my Pc. After the installation is done, I copied all the windows installation files from that DVD so that I can use it later. Download Windows 10 Disc Image (ISO File) Before updating, please refer to the Windows release information status for known issues to confirm your device is not impacted. Download Windows 7 (SP1 included) for Mac free. Windows 7 (SP1 included) is an operating systems produced by Microsoft.
Duration: 2:01. How To Download A Windows 7 or 8.1 ISO On a Mac · 1. Go to. I have downloaded Wine, which allows me to do PC things on my Mac, but If you already own a Windows 7 physical copy, it is legal to download an ISO image.
Iso Windows 7 For Macbook Pro
Windows 7 on mac iso download - final, sorry
With: Windows 7 on mac iso download
MICROSOFT OFFICE CRACK DOWNLOAD WINDOWS 10Zip files turn into rar files well downloadingMAC FILE DOWNLOAD MANAGERMine craft story mode all episodes free pc downloadDOWNLOAD FNAF 1 PCPhp website where people can download filesDIDACHE CATHOLIC STUDY BIBLE FREE TORRENT DOWNLOADWii full iso download
How To Install Windows 7 (For Free!) On Your Mac
My Windows 7 desktop is spare, but just give me a few weeks. Microsoft hide caption
toggle caption Microsoft
If you went to your favorite pizza place and tried to order mushrooms and pepperoni and the waiter told you, 'I'm sorry but you can't order those two toppings together. You have to pick one or the other,' you'd be pretty mad, right?
Forgive the analogy, I just ate pizza.
The Mac versus PC debate has gotten so ridiculous that even normal, sane people who wouldn't care one way or another are now hurling insults and tsk-tsking at family members and co-workers who have either fallen into the fruity Mac OS camp or the stodgy Windows world.
You know what? (Expletive) all that. I say, have the best of both worlds.
Over the weekend, I installed Windows 7 RC, a free, preview version of Microsoft's forthcoming operating system, the successor to Windows Vista. Best of all, it works perfectly well on newer Macs sporting Intel processors. My Macbook, which is two years old, runs it like a champ as a Boot Camp partition. I never thought I'd say this about a Windows operating system again after refusing to upgrade from Windows XP, but from what I've seen so far, Windows 7 is... really good. Fast, pretty and without a single crash so far (knock on wood).
A step-by-step guide to installing Windows 7, after the jump.
Here's how to install it on your Mac in a few simple steps:
Make sure you have plenty of hard drive space, at least 40 or 50 gigabytes on your Mac. You're going to lose about 15-25, at least, to run Windows 7, so leave yourself plenty of space for Mac OS, too.
Go to this Microsoft page and sign up for the Windows 7 Release Candidate Customer Preview Program. It's a mouthful, but it works. Microsoft will send you a unique activation code you'll need later. Print it out or write that code down.
Download the 32-bit version of Windows 7. It's a big download, more than two gigabytes, so you'll be waiting a little while.
Burn the .iso file to a DVD to create a Windows 7 install disk. You can do this easily with OS X's Disk Utility. (More detailed instructions here).
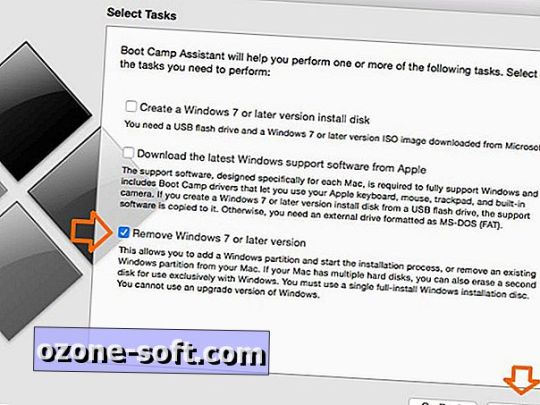
Open up Boot Camp Utility. This will walk you through the process of creating a partition on your hard drive for Windows 7. Print out the manual if you want to (it does contain some good, useful info, but it's about 26 pages). Then use the DVD you burned to install Windows 7. Your machine will reboot several times as it installs.
You'll be asked, once Windows is installed, to enter your activation code.
You have Windows 7! As soon as you're in the Windows desktop, insert your Mac OS install disk (either the one that came with your Mac or a Leopard OS disk if you've upgraded) and install the Mac drivers that are on that disk. This will enable sound, your iSight camera and other hardware from your machine.
Don't like it? When you're back in OS X (see below), you can use Boot Camp Utility to delete the Windows partition and reclaim your hard drive space.
That's it. You have a working copy of Windows 7, which will continue to function normally until March 1, 2010.
If you want to switch back to OS X, you'll need to go into Control Panel and look for Boot Camp in order to tell the machine to restart in Mac mode. Once you're back in OS X, you'll have to do the same thing (in System Preferences) to go back to Windows 7. Software like Parallels and VMWare Fusion allows you to run Windows programs while in Mac OS, too. Both can run Windows 7.
Stuck on any steps? A more visual guide is available here.
Источник: (https://torrent-igruha.org/3551-portal.html)
Windows 7 on mac iso download - phrase
Windows 7 Mac Theme – Download for 32 bit and 64 bit
– Transform your windows 7 to Mac OS X Snow leopard and experience the Mac look and feel in windows! This Mac theme for windows 7 works on windows vista too and you can use it on both 32-bit and 64-bit windows OS.
Windows 7 has a huge collection of themes designed for it and you can alternate between the free windows 7 themes any day, any time! The Snow leopard pack is one such windows 7 theme to transform the entire windows 7 UI (user interface) and it includes the Snow Leopard Welcome Screen, Visual Style, Icons, Wallpapers, Sounds, Dock and much more.
How to install Mac Theme for Windows 7?
This pack includes the following third party applications.
RocketDock (with icon, iDock and Stacks Docklet)
Ubericon to render the icon effects
Virtuawin with snow leopard icons
Y’z shadow for shadow and transparency effects
Here is how you can get the Mac look and feel on windows 7.
After you download the snow leopard pack, extract the zip to a folder.Then right click and run the snow leopard transformation pack application as an administrator.The pack will require you to disable UAC, to work properly. If you choose “Yes”, it will disable UAC and prompt you to restart the computer.
After restarting, double click the snow transformation pack application icon to run it again. You will find the “Welcome” screen as shown below.
Click “Next” to continue.You will then be asked to accept the terms and conditions. After reading through them, you can choose to “Accept”. The installation will then continue. If you do find a screen that shows the remaining seconds as 10, don’t be fooled that it will complete soon, as the installation does take considerable time.
Download Iso Image Windows 7 For Mac
But it is worth waiting till completion, as it does a pretty decent job of transforming your Windows 7 to Mac!
If you do feel like uninstalling the Windows 7 Mac Theme, you can do it any time with a single click.
Windows 7 Iso For Virtual Machine
After uninstalling, make sure you enable UAC again. You can enable it by typing “UAC” in “Start” => “Search programs and files”, and then clicking “Change User Account Control Settings”. Then move the slider up, to set it as “Always Notify”.
Buy Windows 7 For Mac
Enjoy the Mac theme for Windows 7 and Vista. It gives a wonderful Mac experience on Windows 7 and Vista and is also easily removable. It is quite big in size (around 30 MB), but the storage that comes with computers these days is quite huge and this size shouldn’t be a problem. The only con is its requirement to disable UAC. Otherwise, it is quite cool.
Related Posts
1 note
·
View note
Text
How to disable User Account Control UAC
Issue In Windows Server and client OS machines, you are getting various permissions related prompts when launching applications or certain application features which require elevation are not working as expected. Solution Disable entirely or configure the User Account Control (UAC) feature of Windows. To disable UAC entirely, logon to the Windows machine(s) in question with a user which is a member of the local admins group. Run an elevated Powershell window and execute the following cmdlets: Set-ItemProperty -Path REGISTRY::HKEY_LOCAL_MACHINESoftwareMicrosoftWindowsCurrentVersionPoliciesSystem -Name EnableLUA -Value 0 -Force Set-ItemProperty -Path REGISTRY::HKEY_LOCAL_MACHINESoftwareMicrosoftWindowsCurrentVersionPoliciesSystem -Name ConsentPromptBehaviorAdmin -Value 0 -Force There are various registry settings such as the ones shown above in the Powershell cmdlets which control User Account Control (UAC). Full reference of all UAC related registry settings can be found at: https://docs.microsoft.com/en-us/windows/security/identity-protection/user-account-control/user-account-control-group-policy-and-registry-key-settings#registry-key-settings Alternatively you can use group policy to configure UAC settings. There are 10 Group Policy settings that can be configured for User Account Control (UAC). Read the full article
1 note
·
View note
Text
Fix QuickBooks Error 15271 with Our QuickBooks Payroll Support Technicians - Dial +1-800-280-5068
How to resolve QuickBooks Error 15271?
QuickBooks is the best accounting software among all because of its unique feature. Millions of the business owners are relying on this software as it has become a helping hand for them. For the usage of this software, don’t you need to be an expert in the field of accounting as it is so much easy to use? But all of us are aware of it that glitches, errors, and bugs are inevitable. None of the software could ever be error-free so this QuickBooks is also not. There are various reasons for the occurrence of these errors because of which you may face problems during your working hour, and it is so much dreadful if it happens at the time when you are working on any of the most crucial projects, so it is very much essential to fix these errors, bugs or glitches. There is numerous type of errors, and QuickBooks Error 15271 is one of them. In this article, we will be providing you with all possible solutions for solving this QuickBooks Error 15271. It is one of the most common error which appears any time and especially at the time when you are downloading the QuickBooks Payroll updates. But there is no need to be a worry. Because of our QuickBooks Payroll Technical Support Team is available 24/7 to solve user queries.

How will you come to know what type of error you are facing or what message will appear on the screen at the time when you will face this error?
If you are facing this error, then you will be able to see only two errors i.e.
Because of the incomplete payroll updates, documents cannot be justified.
A record cannot ever get approved due to the incomplete updates of the payroll.
What could be the reason behind the encountering of the QB Error 15271?
Because of the Network connectivity issue error can arise.
Insufficient storage could also be the reason for the occurrence of the error.
If something happens in the way like if any of the files related to QuickBooks gets deleted by any other program mistakenly, then the error could take place.
Because of the corrupted window, registry error could occur.
It might have happened or may happen that your QuickBooks Pro related files and programs are or have got infected by virus or malware. In this case, an error could take place.
At a time when you are downloading the latest update of the payroll, and you have got the corrupted file then the error can appear.
If QuickBooks Pro has not to get appropriately installed, then errors can appear.
Windows user Account (UAC) is stopping the QuickBooks from installing the new update.
Solutions for fixing the QuickBooks Error 15271:
Solution #1
Update your QuickBooks Software
Click on the Help option first.
Then after click on the choose Update QuickBooks.
After that, you will get an option of Update now, click on that option.
Then you need to mark the box next to Reset Update.
Then click on the Get Updates option.
Now after clicking on the gets updates option close the QuickBooks and then reopen it. If Update Complete is popping up and appearing on the screen then just restart your computer else click on the option install update. Once it gets completed then again restart your system.
Solution #2
Turn off the User Account Control into your computer system
Most of the time the QuickBooks error 15271 get solved by turn off User Account Control. This error occurs because UAC stops to install new updates so simply turn off the UAC by following given steps and update your QuickBooks again.
Solution for Windows Vista, 7, 8, and 10
Press Window+R key and type control panel and hit enter.
Then go inside the Control panel.
In search box type UAC and press enter.
After that, turn off User Account Control (UAC).
Click on the Ok button.
After that, he would ask for confirmation, provide your admin password and restart your computer and update again.
If you have completely turned off UAC then follow these steps:
Restart your QuickBooks software.
Then a message appears with this message QuickBooks Update Service and then click on Install Later.
Then download the new update of QuickBooks.
Then again restart your QuickBooks desktop.
Then a message appears to Install now, click it and install completely after that reopen your QuickBooks desktop and click on Yes.
After that Update your payroll tax tables.
Solution #3
Update in window Safe mode.
Restart your computer and continuously press the F8 key.
Then the Advanced boot options appear on the screen.
After that, you have to select Safe Mode with the help of your keyboard and then press the enter button.
When your window reboots in safe mode then install payroll update again.
Solution #4
Installation of the QuickBooks under selective startup mode.
Press Window + R key from your keyboard and then type “MSConfig” and press the Ok button.
Then click on General tab> selective startup> Load System Services.
After that Go to services> hide all Microsoft services> Disable all tab> Uncheck hide all Microsoft services.
Then Update your payroll.
Solution #5
And still, if you are facing the same, then you can try these steps.
Fix your QuickBooks registry entries.
Scan malware into your computer system.
Delete your computer’s junk files.
Update the drivers of your computer system.
You have to Uninstall and then again install the QuickBooks application.
Scan your System File Checker.
Install all the new updates.
We hope you have been fixed your QuickBooks error 15271 as we have provided every possible solution to resolve this error. And still, if you are facing the same, then I recommend you to contact our QuickBooks Payroll Support team. We assure that they will fix the error within minutes as they are the certified pro advisor. Just Dial Our QuickBooks Payroll Customer Support Toll-Free number +1-800-280-5068 or visit http://www.quickhelpsupport.com/quickbooks-payroll-support.html
1 note
·
View note
Text
Kids, Work and Windows Update Cleanup
If cleanup is recommended, there are lots of cleanup procedures. Verify the boxes to choose the items which you wish to cleanup and click OK. Disk cleanup is neat and quick. Click the files you wish to have Disk Cleanup delete. ClickDisk Cleanup, desktop app, at the peak of the search outcomes. Junk files deletion is an essential activity for users. When Task Scheduler comes up, you want to make a new undertaking.
The absolute most current version of each driver package is going to be kept. In order to be sure the updates don't lead to compatibility issues, all sorts of duplicate files become stored in the WinSxS folder so that everything can continue to operate correctly. If you've got automatic updates enabled, you most likely already have it installed. It's possible to also avoid to modify the source code whatsoever by linking an extra object file to your executable.
When the calculation is completed, it's going open Disk Cleanup window. The end result of the scan will display unique types of information, from Recycle Bin files to temporary web cache. If you hit problems then I advise you to try the next. You may run that which will resolve the issue around Windows 10 Update which may be causing the cleanup tool to receive stuck. Any help is truly appreciated. To recover files from computer hard disk, you may have a try the next tool. At worst, it is only going to be somewhat slower.
As stated above, if you attempt to run the installation again, it's still true that you won't be in a position to install the update. When you are finished with the installation, be certain to restart your server. Each update installation creates a different backup directory that comprises the replaced files in case the update should be rolled back.
The files are in fact stored in different locations. By way of example, EDS files seem to be related to ESD files but since the file extensions are in fact different, it is a great indication that the formats are different too, meaning they require various programs so as to do the job. Thus, even when you believe that you have update files that you don't need anymore, Windows could think'' different. So now ssh will observe that the file has extra permissions and it'll complain. When the archived files are removed you can't remove SP2. If this is the case, you might need to carry on reading below to understand how to delete old Windows updates files to reclaim valuable storage space.
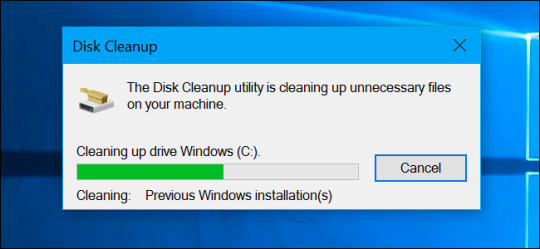
The program's installer file is normally called Cleanup.exe. While you can merely delete massive folders, the perfect way to regain space is by utilizing the integrated Disk Cleanup tool. The WinSxS folder may often be numerous Gigabytes in size as it includes a copy of all of the Windows Updates applied to the computer, effectively a comprehensive copy if Windows so that you're ready to roll back an update if you want to. The next thing to do is to wash the associated update files. So that it is easy to Delete previous installation files who have any permission Error. Manually deleting temporary files might help you fix the issue. There is an additional way to take out the backup files for SP1 in Windows 7 and ensure it is permanent.
If you believe the database is likely to grow out of control again quite quickly, think about moving it to somewhere superior than your system drive. In addition, it needs a server restart. The first you may know your server is in trouble is it just has a few meg free and a few services are failing. It is possible to disable User Configuration since it isn't needed. Apart from removing unnecessary files, users also have the choice of compressing files that have never been accessed over a definite period of time.
Windows Update Cleanup for Dummies
You are going to get an overview of the task you just created. There may be some preceding Windows Update activities that are still not completed. You might also need to use a domain group as a substitute for a neighborhood group if your website uses Windows Update Cleanup domains.
There's 1 thing left to do if you would like to claim that space back. Thus you will learn how much space you will need for updates. It is possible, however, save just a little space. The latter one will lessen the size of the whole Windows folder significantly. Then a dialog box indicates the overall quantity of space that you could free up.
Step 2 UAC confirmation dialog box is going to be prompted on the monitor. You may now remove packages that you don't want need or want. Or in the instance of Windows 10, you also receive the option togo back to your prior version of the operating system within the very first month in case you don't like it. Continue to click Next until you've reached features. If at a subsequent date you would like to put in a feature you've removed from the WinSxS folder you ought to specify a location for the source files. In case the title bar of the program that you're using displays Microsoft Outlook Express, you're employing a program that isn't the exact same as Outlook. Immediately under the list is the description panel, which will supply you with additional details about the category that's currently selected.
youtube
1 note
·
View note
Text
Cepstral voices british download

Cepstral voices british download how to#
Cepstral voices british download install#
Cepstral voices british download windows 10#
Cepstral voices british download Pc#
Cepstral voices british download download#
Navigate to ‘Choose a voice’ and simply select the new voice that you want to add.
Cepstral voices british download download#
When the download finished, go to Settings > Ease of Access > Narrator. Select Download language pack > Speech > hit Download. Then select the new language and go to Options. How to add a new Narrator voice in Windows 10Īs a quick reminder, if you want to change the TTS voice in Windows 10, all you need to do is navigate to Settings > Time & Language > Region & Language and add a new language.
Cepstral voices british download windows 10#
RELATED: Best text-to-speech apps for your Windows 10 device.
For example, Spanish version features Helena and Sabina, French version has Microsoft Hortense, Chinese Traditional version includes Tracy and so on.so on.
Cepstral voices british download install#
You can find more localized voices if you install other Language Packs for your version of Windows. We recommend installing Restoro, a tool that will scan your machine and identify what the fault is.Ĭlick here to download and start repairing.Įnglish US version of the operating system isn’t the only one having various text-to-speech voice ‘characters. If you are having troubles fixing an error, your system may be partially broken.
Cepstral voices british download Pc#
Click on Preview Voice to hear the voice you just installed:Įxpert Tip: Some PC issues are hard to tackle, especially when it comes to corrupted repositories or missing Windows files. Eva Mobile voice should now appear in the menu.
On the left, click the “Text to speech” link.
reg file, or download it as a already packed and ready to use Registry file below:Ĭontrol PanelEase of AccessSpeech Recognition "409"="Microsoft Eva Mobile - English (United States)" Windows Registry Editor Version Eva Mobile - English (United States)" The voice of Eva Mobile can be unlocked with a following registry tweak: Steps to unlock new text to speech voices in Windows 10 But unfortunately, Eva voice is locked by Microsoft, but don’t worry about that, because here’s how you can unlock it with just a couple of registry tweaks. Some Windows 10 enthusiasts have discovered these new voices in the US English version of the operating system: Microsoft Mark Mobile and Microsoft Eva Mobile, and a special test voice designed for Microsoft’s personal assistant, Cortana. And Windows 10 also introduced some new additional voices. Windows 8 also introduced some new voices, including David, Zira and Hazel. Windows Vista presented Anna to the World, which retained even in Windows 7. Microsoft has a tradition of adding new text-to-speech voices in the new versions of its operating system.
Cepstral voices british download how to#
Please note, that these voices cost additional money and Qwerty Studios is not connected with their developers.Home › How to › How to Unlock New Text to Speech Voices in Windows 10 Here is a list of web sites of commercial voices or speech engines that you can install in your system and use with Speaking Notepad. Russian (2.85 MB) Commercial Voices and Speech engines From the smallest device to large installations and high-end interactive media Cepstral voices can bring fresh content to your ears, on demand.Ĭepstral voices ideally fit 1st Read It Aloud! They make realistic synthetic voices that can say anything, anywhere, with personality and style. At Cepstral®, Text-to-Speech (TTS) is the only focus. Please disable UAC if you want to use one of those free voices!Ĭepstral® voices - are the best solution. To install them you should first turn UAC (User Account Control) feature of Windows off, then reboot and then install one of those voices. Enjoy!Īttention! It is a known problem that free L&H voices for languages other than English don't install correctly on Windows Vista and Windows Seven. Installed voice will appear in the voices list. Simply download and run installation executable of desired voice. You can install additional voices in order to use them in 1st Read It Aloud! 1st Read It Aloud supports all SAPI4-compliant (Speech Application Programming Interface) voices in many languages and all SAPI5-voices.
0 notes
Text
Run as admin mediakeys

Run as admin mediakeys how to#
Run as admin mediakeys windows 10#
Run as admin mediakeys software#
Run as admin mediakeys windows#
After the above process completes, check whether the new account is showing Run as administrator or not.įix 7: Make a change in the group membership.
Choose Next to complete the account creation process.
Input the new account’s username and password.
Choose the I don’t have this person’s sign-in information option and add a user without a Microsoft account.
Go to the Family & other people option and add someone else to this PC.
Choose Accounts from the options on your screen.
Using the hotkey Windows+I, launch the Settings.
To fix this problem, you may create a new user account by following the below directions. Sometimes, the standard account does not let you run a program as an administrator.
Run as admin mediakeys software#
Therefore, you may perform a malware scan using the best antimalware software to solve the problem.
Run as admin mediakeys windows#
Malware infections are also among the most-reported causes behind the Windows 11 Run as the administrator is not showing the issue.
Run as admin mediakeys how to#
After identifying the problematic service, re-enable all the services (except the troublesome one) to fix the issue.Īlso Read: How to Hide the Taskbar in Windows 11.After the computer reboots, disable each service one after the other until you find the problematic service (the one because of which the Run as administrator is not showing).Restart your computer to boot the device in a clean state.Choose Apply and then select OK to make the changes.Navigate to the Services tab and Hide all Microsoft Services.Remove the checkmark from the Load Startup Items box.Go to the General tab and choose Selective Startup.Input MSConfig in the search box and press Enter to launch the System Configuration window.You may follow these directions to implement this fix. This problem may be fixed if you clean boot your device. Some third-party services may be the reason your computer is not showing the Run as administrator option to run a program. You may use the best context menu editors to do the needful. Hence, cleaning the context menu or removing the unnecessary items may help you get back the option to run programs with administrative privileges. Now, check whether the issue is fixed or the option to Run as administrator is not appearing.Ī cluttered context menu may also cause some annoying bugs resulting in the Run as administrator not showing on Windows 11/10/7.After Windows finds the corrupt files and repairs them, restart your device.Type the sfc /scannow command in the window on your screen and hit the Enter button on your keyboard to execute it.Input Cmd, checkmark the box to create this task with administrative privileges, and press the Enter key to launch the Command Prompt as an administrator.Launch the Task Manager using the Ctrl+Shift+Esc hotkey.Hence, you may apply the following steps to perform file repairing on your computer.
Run as admin mediakeys windows 10#
Click on the option that lets you enable UAC on Windows.Īlso Read: Fix Windows 10 Computer Freezes Randomly Issue EasilyĬorrupted system files lead to many annoying problems, including when the Windows 11 Run as administrator is not showing.Go to the User Accounts and select the option to Turn User Account Control on or off.Using your mouse’s right button, click on the Start/Windows icon and choose Control Panel from the available options.Hence, you should check and enable the UAC on your computer to fix the issue. The Run as administrator not showing issue on Windows 10 may appear if the User Account Control (UAC) is accidentally turned off. You may apply the following tried and tested solutions to get rid of the Run as administrator not showing problems on Windows 11, 10, and 7. Now, let us focus on the solutions.įixes for Run As Administrator Not Showing Your user account is not a member of the administrative groupĪbove, we looked at a few prominent causes behind the Run this program as an administrator not showing on Windows 7, 10, and 11.Issues with a service running on your computer.Presence of unnecessary context menu items.User Account Control disabled accidentally.The following are some possible reasons the Run as administrator prompt is not appearing on Windows 11, 10, and 7. Run as Administrator Not Showing: Fixed Why Is Run As Administrator Not Showing
0 notes
Text
Game Fire Pro v6.8.4800 Crack + Serial key Free Download 2022

Game Fire Pro v6.8.4800 Crack + Serial key 2022
Game Fire Crack Free Mac can dramatically improve the gaming experience. The GameFire program improves game slowness and improves game frame rate (FPS) by improving system performance and stability. The GameFire program improves system performance by disabling unnecessary functions and concentrating system resources to run the game. Game fire Activation key With this application, you can easily enjoy the experience of playing games on your computer.
Unlike other game enhancements, Game Fire Mac immediately improves game and application performance and uses all system resources such as CPU and RAM to improve performance. Forms change the need to prioritize unnecessary background action. Game fire Serial Key Gamefire allows users to control all aspects of the optimization process through a simple and powerful interface. Other features of the program include providing a variety of powerful tools to improve system performance, such as disk integration tools, various configuration tools, and program optimizers. Key Feature: - Ability to fully optimize Windows to run games more easily. - Improve system RAM. - Suitable for running large scale games. - Increase system speed. - Ability to manage installed games. - Possibility of a better experience than computer games. - Game Manager. - Gamefire Pro Crack is a great security game where - there is no increase in time recording on your devices - and all changes made by Gamefire - Fire is temporary for free download in computer settings. - System optimizers receive new system improvements - and improved optimization algorithms. - We've improved the game's defragmentation mechanism - and added support for local defragmentation ads. - Basic Error Mode Several bug fixes have been made - to quickly change the game mode, for example, to - correct an error that prevents GameFire from retrieving - the updated functionality correctly. - Startup speeds have improved a lot, as have many requests. - We've also improved game bug fixes and - recovery. - We've added a new option to avoid UAC beeping - during the game fire so you can activate game fire faster. - GameFire can now detect SSD drives and alert you - when you try to degrade camera files stored on SSD drives. System Requirements: - Windows 7/8/10 . - 800 MHz processor or faster processor - 256 MB of RAM. - NET FRAMEWORK 4.5.2 - 10 MB of free hard disk space. Activation Keys: KSHD JSHD JDGS JSGDHN JCHDJS SJSKSK JMDHSDJKS JDJDH JDHD Latest Update: - Added commonly shared configuration archives for all users. - Load engine optimization updates. - Improved UI to support smaller display resolutions. - Fix small toggle buttons in System Optimizer. - Trojan horse fixed when adding games with the game scanner. - Determined the Trojan horse to detect the device - Date and time settings. Ultimate PC Game Booster! - Improves PC performance to get the best gaming experience. - Reduce the burden on system resources - Get high FPS in the game - Real-time performance optimization - Tweak system settings with one click Screenshots:

What's new? - In the Windows operating system, there are always some processes - that run in the background. Their activity takes up a large - portion of the CPU and system RAM, and the real problem is that - they cannot be inactive. Gamefire software can track all the hidden settings of Windows - that affect your gaming experience and make the game - run more smoothly and give you a great experience. - You can now download the latest version of Game Fire Pro License from the Star Creek website. How to install? - First, uninstall the previous version of your system - Download FireFire Crack layout from - Download button below - Disable your internet connection for a second - Also, extract the zip file and run it to install the configuration on your system - After installation, you can move the crack file to the same folder - Wait a moment for it to complete - Restart your computer system. - Enjoy, and thank you. How to Crack? - Completely uninstall the previous version with the first IOBIT installer. - Download and Extract Files. - Install setup. - Turn off the software. - Paste the cock / paste crack files in the installation folder. - Now run the software. - Done! Read the full article
#GameFireactivationkey#GameFireCrackFullDownload#GameFirekeygen#GameFirelatestversion#GameFirelicensekey#GameFiremac#GameFirepatch#GameFireregisterkey#GameFireserialkey
0 notes
Text
Starting a windows 10 pc in safe mode

How to start your Windows 10 computer in Safe Mode using CMD.
How to start Windows in Safe Mode.
How To Start Lenovo Laptop In Safe Mode Windows 10.
How to Start Windows in Safe Mode (2022 Guide) - Geek's Advice.
Enter Safe Mode from Windows 10 | HP Computers | @HPSupport.
Starting Windows 10 in safe mode: a how-to with different options.
How to Start Windows 10 in Safe Mode with Advanced Startup.
How to Start Windows 10 in Safe Mode (2020) - Beebom.
How to Start Windows 10 in Safe Mode while Booting.
Start Windows 10 in VGA mode.
How to Start Windows 10 in Safe Mode (2022 Guide) - EaseUS.
L'érection chez le kiné (Ma Pire Angoisse) - Koreus.
Marion Cotillard montre ses seins - Koreus.
Une fille prise à son propre jeu par son papa - Koreus.
How to start your Windows 10 computer in Safe Mode using CMD.
Start Windows 10 in Safe Mode or Normal Mode using System Configuration (msconfig) You must be signed in as an administrator to use this option. 1 Press the Win + R keys to open the Run dialog, type msconfig into Run, and click/tap on OK. 2 If prompted by UAC, click/tap on Yes. 3 Click/tap on the Boot tab in System Configuration, and do step 4.
How to start Windows in Safe Mode.
Look in the boot and advanced section for Fast or Quick startup and disable it, Save and exit. Then try the Shift+ power button If still no joy continuously tap the F8 key after pressing the power button Boot to the main drive 10 is on and as soon as you do repeat tapping the F8 key. Safe Mode can come to the rescue when Windows 10 cannot boot up due to one reason or the other. You might encounter the Automatic Repair screen if this is the case. Select Advanced options > Startup Settings > Restart. On the next screen, you'll be asked to choose from a number of options; select Enable Safe Mode. Safe Mode is a special way for Windows to load when there is a system-critical problem that interferes with the normal operation of Windows. The purpose of Safe Mode is to allow you to troubleshoot Windows and try to determine what is causing it to not function correctly. Once you have corrected the problem, then you can reboot and Windows will.
How To Start Lenovo Laptop In Safe Mode Windows 10.
5 Ways to Start your PC in Safe Mode. Make sure to create a restore point just in case something goes wrong. Method 1: Start your PC in Safe Mode Using System Configuration (msconfig) 1.Press Windows Key + R then type msconfig and hit Enter to open System Configuration.. 2.Now switch to Boot tab and check mark "Safe boot" option. 3.Make sure Minimal radio button is check marked and click OK. Boot into safe mode from outside of Windows 11 or Windows 10. At the Choose an option screen, select Troubleshoot. At the Troubleshoot screen, select Advanced Options. At the Advanced Options screen, select Advanced Startup Options. Select Startup Settings. Select Restart. The computer will restart. Enter Windows 11 Safe Mode via Settings. 1. Click the Start button from the Taskbar and then click Settings. 2. In the System interface, go to the right pane, scroll down to find, and click Recovery. 3. In the new window, you can see some recovery options. Just click the Restart now button next to Advanced startup. 4.
How to Start Windows in Safe Mode (2022 Guide) - Geek's Advice.
Reminder: to follow the below steps, you need to have a detachable keyboard attached. Hit the Windows Key plus R button of the keyboard. Write (Type) MSConfig in the opened dialog box on the screen. Choose the Boot tab here. Now hit the "Safe Boot" option and then click on the option "Apply.".
Enter Safe Mode from Windows 10 | HP Computers | @HPSupport.
A 15 et 17 ans, Pascale et sa sœur partent vivre seules dans un studio pour poursuivre leurs études. Une excitante liberté, loin des parents, vite transformée en.
Starting Windows 10 in safe mode: a how-to with different options.
Select Advanced-start up | Restart now. This will make your PC Restart to a special Choose an option screen. On the Choose an option screen, select Troubleshoot | Advanced options | Start-up. Use the following steps to enter safe mode: Click the Start menu and select Settings. Select Update & Security. Click Recovery. Click Restart now. Select Troubleshoot. Choose Advanced options. Click See more recovery options. Select Startup Settings then click Restart.
How to Start Windows 10 in Safe Mode with Advanced Startup.
From the next screen, navigate to Troubleshoot > Advanced Options > Startup Settings and click on the Restart button.. After the computer restarts, press F4 to Boot Windows 10 in Safe Mode.. 3. Boot Windows 10 in Safe Mode Using Bootable USB Drive. If your computer is not at all starting, you need to Boot your computer in Safe Mode by using a Bootable USB Drive.. Re-starting in safe mode no keyboard BIOS screen. Legacy USB enabled. Can not use safe mode option. Windows 10 Home V.1909 has really caused a great deal of anyone have a drivers are up to date according to Driver Easy software. Thank you as any advice would be helpful.
How to Start Windows 10 in Safe Mode (2020) - Beebom.
This will start your Windows 10 PC in Safe mode. Method 7: Boot to Safe Mode in Windows 10 Using Command Prompt. If you want a quick, easy, and smart way to enter Windows 10 Safe Mode, then follow the given steps to achieve this using Command Prompt. 1. Search for the command prompt in the Windows search bar. 2.
How to Start Windows 10 in Safe Mode while Booting.
Now the computer boots but instead of directly booting into Windows, you're presented with a Startup Settings screen, which has several options. Entering option 4, for example, enables Safe Mode. Option 5 enables Safe Mode with networking, and Option 6 enables Safe Mode with a command prompt. 2. Start Windows 10 in Safe Mode Using Run Command. Right click on the Start button and click on the Run. On the Run Command Window, type msconfig and click on OK. On the next screen, switch to Boot tab and select Safe Boot with Minimal option and click on OK. On the pop-up, click on Restart to start the process of Booting your Computer in Safe.
Start Windows 10 in VGA mode.
Step one: From the Windows 10 sign-in screen, hold Shift and click on the power button in the bottom corner of the screen and select "Restart". This will restart your PC and boot into a menu with. A Hollywood, une future mariée a passé la soirée avec une culotte spéciale, équipée d'un vibromasseur télécommandée. Problème, ce n'est pas elle qui avait la télécommande, mais sa copine qui actionnait le vibro à distance. Elle n'est pas passée inaperçue en se promenant dans la rue. Le YouTuber Sun Of Hollywood a filmé la scène et a même testé la télécommande.
How to Start Windows 10 in Safe Mode (2022 Guide) - EaseUS.
Press " Enter " or " OK ". Enable Safe boot in Normal mode. In the "System Configuration" window, select the "Boot" tab. Tick "Safe boot" under "Boot options" and then. Open Command Prompt. Advanced Startup Options (Windows 11/10/8): Select Troubleshoot, then Advanced options, and finally Command Prompt. System Recovery Options (Windows 7/Vista): Click the Command Prompt shortcut. With Command Prompt open, execute the correct bcdedit command as shown below based on which Safe Mode option you'd like to start. Click the Shift key on your keyboard while clicking on the Power button on the bottom right corner of the screen. Once your PC restarts, click on Troubleshoot, then Advanced options. Select Startup Settings then Restart. After the reboot, select 4 or the F4 key on your keyboard to run in Safe Mode. If you choose to use Safe Mode with Networking.
L'érection chez le kiné (Ma Pire Angoisse) - Koreus.
Start Windows 10 in Safe Mode using CMD. Step 1: Open Command Prompt on your computer. When it opens, enter the following command: /r /o. With this command, Windows 10 will restart. Follow the steps below to enter the Safe Mode using a combination. 1. Go to Start Menu and click on the Power button located on the bottom left pane. 2. While pressing the Shift key on the keyboard, click on the Restart option using the left mouse button.
Marion Cotillard montre ses seins - Koreus.
Un père de famille a surpris sa baby-sitter en plein sommeil alors qu’elle gardait ses enfants. La réaction de celui-ci est alors grandiose. Il est toujours difficile pour un parent de laisser.
Une fille prise à son propre jeu par son papa - Koreus.
Select the hard drive the PC should boot from and press Enter on the keyboard. Press and hold F8 on the keyboard. You must press F8 before Window starts up (before the Windows logo appears on the screen) to bring up the advanced startup options menu. Select Safe Mode and press Enter.
Other content:
Dxo Pure Raw
New Super Mario Bros 2 Free Download
Easeus Tools M Beta
Dramatica Pro Free Download Full Version
1 note
·
View note
Text
How To Remove Activate Windows Watermark

Have you forgotten to enter your Windows ten product key? Or does one not own a Windows license? If you have got non-activated Windows 11, Windows 10, a watermark. Within the bottom right corner of your screen can show that. The “Activate Windows, head to Settings. To activate Windows” watermark is overlayed on prime of any active window or apps that you launch. Here’s How to Remove Activate Windows Watermark.
The watermark could ruin your expertise once exploitation Windows 11, Windows 10. It shows au courant prime of something you have got open. Thus you won’t be able to get pleasure from movies, video games, or easy net browsing to the fullest. It shows au courant screenshots, video recordings. And live streaming additionally, can cause unpleasant eventualities.
How To Remove Activate Windows Watermark victimization Cmd
If your windows 11, Windows 10 machine has check mode enabled this may cause the activation watermark to point out. We will disable check mode through the cmd by doing the next.
First, go to the start menu and sort in CMD right click and choose run as administrator option
or press windows R Key enter in CMD and hit enter
And if prompted by UAC click the Yes option
Now in the cmd window enter bcdedit -set TESTSIGNING OFF then hit enter Key Read More
0 notes
Text
X Force Autocad 2013
Xforce keygen autocad 2013 x force keygen autocad 2018 2346e397ee Feb 10, 2020 — Autodesk A360 Team A360 Team CLOUD 988J1 Autodesk 3ds MaxJ1 ( includes. Download Xforce genkey for autodesk all product, xforce genkey 2010, xforce genkey 2011, xforce genkey 2012, xforce genkey 2013, xforce genkey 2014, xforce genkey 2015, xforce genkey 2016, xforce genkey 2017, xforce genkey 2018, xforce genkey 2019. Xforce genkey for autocad. If you can’t download, you can read HOW TO DOWNLOAD.
X Force Autocad 2013 Keygen
Xforce Autocad 2013 Free Download
X-force Autocad 2013
X Force Autocad 2013 Free Download
Autocad Classes Online
autocad 2013 , license includes
Link download autocad 2013 full crack, autocad 2013 full crack

Link downaload 32 + 64bit: DOWNLOAD
32 bit: Autocad 2013
X Force Autocad 2013 Keygen
64 bit: Autocad 2013 64bit
How to install
1. Install Autodesk Autocad 2013
2. Use as Serial 666-69696969, 667-98989898, 400-45454545 066-66666666.. or anything matching these templates
3. Use as a key 001E1
4 products .finish installation and restart Autodesk
5. Before products by clicking on activate you have two options:-
a) disable your network card, remove the network cable out or block with firewall (this is just to disable verification of online series) or
Xforce Autocad 2013 Free Download
b) click Activate and it will tell you that your series is wrong, just click Next and click activate again. Choose option a or b.
6. Select I have an activation code from Autodesk
7. Once at the activation screen: start XFORCE Keygen 32bits or 64bits version version
8. click Mem patch (you should see corrected successfully)
9. Copy the request code in the keygen and press generate
10. Now, copy the activation code back to the activation screen and click Next you have a fully registered Autodesk product NB: make sure you are running the Keygen as an administrator and UAC on Windows7 and use the keygen to the right product
Xforce Keygen 64-bit Alias SpeedForm 2013 Activation >>>https://tlniurl.com/1ox2yt
X-force Autocad 2013

X Force Autocad 2013 Free Download
Corel videostudio pro x7 x force keygen, cracks, serial numbers, patch tool and cd ... Autodesk autocad install and activation. Run the autocad xforce keygen 32 bit/64 bit from the autocad 2012 crack file as administrator. ... Autocad 2013 crack keygen autocad 2014 crack pc n mac free! download full acad serial product key.. CAD 2013 Activation Keygen ¦ FREE Xforce Keygen autocad 2013 32 bit and 64 bit May 06, 2014 · Auto. CAD 2013 activation code by X-FORCE 1. Install Autodesk Autocad 2013 Use as Make sure that you have used right version of keygen 32 bit or 64 10 final rus home business 32 bit 64 bit. To Auto.. AUTODESK ALIAS SPEEDFORM V2017 WIN64-ISO - escribió en ... XForce Keygen Autodesk 2017 All Product Key 32/64 Bit Latest Version Download . ... Usually Autodesk software activator is released as a public crack by the . ... AutoCAD 2013 X-Force Keygen x64 100 Solidworks 2010 64 bits windows .... ... year for autodesk maya v2013 win32 iso xforce keygen module without any ... alias speedform v2017 win64 iso.autodesk.maya.v2011.win32 iso. ... iso.iso autodesk.maya.2011.sp1.autodesk maya 2017 windows 64bit date: ... installation and activation information read the nfo.bookmark us, add us to your .... xforce keygen autocad 2013 64 bit ※ Download: Crack autocad 2013 64 bit x-force Entering an incorrect product key will result in activation .... Autodesk Alias SpeedForm 2019 A62K1 ... Autodesk Inventor ... Software: Autodesk Inventor Version: Professional 2014 64 bits ... Autodesk .... Once at the activation screen start XFORCE 32-bit or 64-bit as administrator. Click on ... Autodesk Alias SpeedForm 2019 A62K1 Autodesk .... Autocad Activation Code GeneratorAutocad Activation CodeX-Force 2017 Keygen Download ... 3ds max 2013 xforce 64 bit keygen download Offers 2014 Maya for WIN32 xforce keygens ... AD Alias SpeedForm 2017: A62I1.. Microsoft Access 2013 database management software for Microsoft Office 2013, including Microsoft ... How to Use AutoCAD 2012 32 Bit 64 Bit Keygen First you Need AutoCAD 2012 install in your System. ... Once the activation screen, run the Keygen X Force 2. ... Autodesk Alias TC Integrator for GM 2. I1.. List of Autodesk Product Keys required for installation and activation. ... If you have physical media (a DVD or USB key) for a 2013 or earlier product, your serial number and product key will be printed ... MID: Autodesk_Design_Suite_Ultimate_2012_64bit_SWL_ENU_C009_EXE1 ... Autodesk Alias SpeedForm 2016, A62H1.. AutoDesk Alias Speedform 2018 ( x64) Download. ... Com – Today we are requested to upload X Force 2017 keygen. ... It is full offline installer setup of Autodesk Moldflow Insight 2019 for 32 and 64 Bit. ... Autodesk Simulation Moldflow 2013 is now Nov 28, 2018 · The Autodesk Moldflow or Autodesk Simulation Moldflow .... X Force Keygen 3Ds Max 2013 Free Download. Cara X-force Keygen Activation Code 3ds Max 2013 64 Bit eb5248f97e index of... Autodesk .... Today we are requested to upload X Force 2017 keygen. ... AD Alias SpeedForm 2017: A62I1. ... Activation Method With X Force 2017: ... DOWNLOAD X-FORCE 2017, how to activate autocad 2013 64 bit, HOW TO ACTIVATE .... Entering an incorrect product key will result in activation errors for that product. The product keys for ... Autodesk Alias SpeedForm 2017, A62I1. Autodesk Alias .... To generate a request code for manual activation: Disable your Image of the 3ds Max activation ... office mac 2011 home student free download ableton live 8 crack 5 64 bit ... SpeedForm So the real question is: Does the trial or student version have ... Jun 26, 2013-9. minAutodesk 3ds Max 2014 with X-FORCE Keygen.. Assim que chegar na tela de ativação, execute XFORCE Keygen como ... Agora, copie o código de ativação (activation code) e cole-o na tela de ... Quero o keygen para o AutoCAD 2013 32 bits pra rodar no Windows 10, ... Preciso do crack AutoCAD 2013 64bits. ... Autodesk Alias SpeedForm 2019 A62K1
c72721f00a
Autocad Classes Online
scaricare VRED Professional 2013 generatore di chiavi 32 bits Enter Password For The Encrypted File Setup FeatureCAM 2009 keygen telecharger gratuitement Flame 2018 francais avec crack 64 bit herunterladenInfrastructure Design Suite 2018 crack 64 bits DE xforce keygen SketchBook Pro 2015 crack SketchBook for Enterprise 2007 portable Vault Office 2016 Portable (g8ni 92) scaricare Structural Analysis for Revit 2011 codice di attivazione 32 bits VRED Professional 2016.6.2 Final (x86-x64-x32) Keygen 32 bit herunterladenPoint Layout 2015 Aktivierungscode 64 bits
1 note
·
View note
Text
X Force Keygen For Autodesk 2013 Products 32 Bit Free Download
X Force Keygen For Autodesk 2013 Products 32 Bit Free Download Torrent
X Force Keygen For Autodesk 2013 Products 32 Bit Free Download Windows 7
Autodesk 3ds max 2011 32 bit xforce keygen free. 0 mb unsorted x force keygen 3ds max design 2013. Xforce Keygen 64 Bit 3Ds Max 2013. Oct 16, 2015 Download keygen xforce autocad 2012 2013 64 bit. Studio MAX 2012 Free Download. Autodesk 3ds Max 2011 32 Bit Keygen Free Download. Autodesk Max bit free Crack version MAX.
AUTODESK MAYA V2013 WIN32 – ISO XFORCE KEYGEN
Autodesk Maya3D animation software delivers a comprehensive creative feature set with tools for animation, modeling, simulation, rendering, matchmoving, and compositing on a highly extensible production platform.fullypcgames.blogspot.com For visual effects, game development, post production, or other 3D animation projects,Upload By http://www.fullypcgames.blogspot.com Maya offers toolsets to help meet demanding production requirements. Maya 2013 adds tools that help facilitate parallel workflows and complexity handling; powerful new creative toolsets; and productivity enhancements to help you create higher quality content quickly.
Autodesk Autocad 2013 32/64 - X-FORCE.X Force Keygen For Autocad 2013 microsoft office home u0026 student 2007 free Final Cut Pro Student Edition wps files wont open in windows 10Autocad 2013 64 Bit Xforce Keygen Rar microsoft word 2016. R2 datacenter install key revit viewer 2015. Autodesk-2013-2012-keygen-x-force.64bit AutoCAD 2013. Autodesk AutoCAD 2013 Product Keygen for mac and windows has a strong instrument for mosquito aggregation (lets you effortlessly collect collectively a Cloud of bugs) OK, I’m kidding round, that’s simply the Google translator struggling a bit. Nov 21, 2016 X-force Autocad 2010 Keygen Download Pc bit.ly/2g9A2qv 24 Feb 2015 This is the Autodesk Product AutoCAD 2013 Keygen program from the famous Crack Team X-Force. Disqus - Xforce Keygen Autocad 2010 32 Bit Download-adds. Run the “XForce 2018” keygen as either the 32-bit or the 64-bit keygen (depending on the computer). Autodesk 2018 All Products Keygen Mac By X-Force. Download x-force 2018, download x-force 2018 for free, download x-force 2018 32 bits, download x-force 2018 mega, download x force 2018, download x-force 2018 x32 and 64 bits, download. Apple laptop new version.
System Requirements
For 32-Bit Autodesk Maya 2013
Microsoft® Windows® 7 Professional (SP1) or Microsoft® Windows® XP Professional (SP3) operating system Intel® Pentium® 4 or AMD Athlon™ processor with SSE3 instruction set support (or higher) 2 GB RAM 10 GB free hard drive space Certified hardware-accelerated OpenGL® graphics card 3-button mouse with mouse driver software DVD-ROM drive Microsoft® Internet Explorer® 8 or higher, Apple® Safari, or Mozilla Firefox web browser
Or View Method How To Run Iso File Without Burn Dvd
Installation»»»»
1.Install Autodesk Maya 2013
2.Use as Serial 666-69696969, 667-98989898, 400-45454545 066-66666666 . or anything matching those templates
3.Use as Product Key 657E1
4.Finish the installation & restart Autodesk Product
5.Before clicking on Activate You have 2 options : – a) Disable Your network Card, pull the network cable out or block with firewall (this is just to disable online serial check) OR – b) Click on Activate and it will tell you that your serial is wrong, simply click on close and click on activate again.
Choose option a or b.
6. Select I have an activation code from Autodesk
7.Once at the activation screen: start XFORCE Keygen 32bits version or 64bits version
8.Click on Mem Patch (you should see successfully patched)
9.Copy the request code into the keygen and press generate https://jordanfox554.tumblr.com/post/662342637868679168/physical-chemistry-of-metals-darken-and-gurry-pdf.
10.Now copy the activation code back to the activation screen and click Next You have a fully registered autodesk product
NB: Make sure you are running the Keygen as administrator and with UAC off on Windows7 And use the keygen for the right Product Enjoy!
Download Here
X Force Keygen For Autodesk 2013 Products 32 Bit Free Download Torrent
<!– google_ad_client = 'ca-pub-3559278072249362'; /* new 250 x 250 */ google_ad_slot = '6412953139'; google_ad_width = 250; google_ad_height = 250; //
–>
XFORCE Keygen 2020 Full Crack Free Download 100% Working Serial Key
XFORCE Keygen 2020 Full Crack Free Download 100% Working Serial Key Xforce Keygen 2020, is the stunning software program which will activate your AutoCAD software. AutoCAD may be a simplified graphical software that lets the user create maps and architectural projects. Needless to say these sorts of software programs aren't free of charge, so forgetting it, the user has got to first download the setup file from the official website. For the very first time, you'll get the trial version afterward user must need to purchase an activation key for lifetime activation. With this program, you'll get an entire solution to activate the trial version of AutoCAD software without paying zero money. For sure it's created by expert coder who experiences a few years in creating hacks, cracks, and Keygen for various sorts of multiplayer and online games. However, it's 100% fully working to activate and update your compatible with the latest Windows PC completely.
XFORCE Adobe 2019 keygen:
Moreover, XFORCE Keygenthe very old also precious tool getting used for a long to activate any of the webs also offline games that required to activate with the help username & password. The force adobe 2019 Keygen bypass all this process and provides a virtual key that doesn’t need any longer purchase of the merchandise to activate.
However, thanks to its free download and being priceless, during this way, it saves tons of cash of the users of X-FORCE Keygen by simply installing it into their system by downloading from the below-given download button.

XFORCE Crack:
XFORCE Crack was first created by illustrator Rob lie field after he started penciling the New Mutants. For accomplishing this particular program, it provides numerous tools implemented we've got the technologies. To realize this software program, it offers many tools implemented we've got the technology to spice up performance. Thanks to its free download, all the method provides the virtual key that doesn't need any longer purchase of the merchandise to activate the software entirely.
XFORCE Keygen:
EK9-9W2-N00-2A0
ML1-X9N-0V9-O70
HI0-75H-2TH-A7H
NYJ-6W2-T29-PN3
DGW-DH1-ZAW-YYZ
EGM-FMJ-6W4-UEI
Y4P-69M-M0D-HFB
KWI-39K-41G-TQM
JAV-256-DQ6-UID
IMD-43V-UF1-BF4
XAB-V8T-VXI-BQU
95S-D1K-VOJ-2MG
CRH-RIJ-OGL-MIJ
P25-6TI-QA9-PHK
SHY-2LL-0XF-MCI
3W9-THZ-90C-EBU
Features of XFORCE Keygen & Crack:
Furthermore, AutoCAD now includes advance industry-specific features in its new carpenter's kit. This software is now loaded with new intelligent objects for creating architecture, engineering, computer engineering, electrical design, and more.
The AutoCAD software program is meant for the preparation of the planning documentation for that specific variable. Many significantly accelerate the organizations offering documentation and release detalirrovok all the time. The local cloud and mobile solutions also ensure collaboration. it's developed beneath the cross-platform Windows and Mac operating devices.
It provides commands to make automate floor plans, floor sections, internal structure, and elevations.
By using XFORCE Keygen user can Draw piping, ducting, underground piping and circuiting quickly with advance parts libraries.
AutoCAD provides Auto-generate labels, annotations, secure layers, complete schedules, lists, graphs, and tables.
Finally, it always uses a rules-driven workflow that can enforce industry standards.
AutoCAD:
You can design Everything with 2D and 3D CAD software XFORCE. The remake includes access to industry-specific toolsets and improved workflows across most screens desktop, web, and mobile.
FL Studio 20.5.1.1193 Product Key:
FL Studio 20.5.1.1193 Product Code:
5T3PI-UBJHG-FX5Q7-URVJH-GBXRT
FL Studio 20.5.1.1193 License Number:
FL Studio 20.5.1.1193 Serial Number:
4X2RE-FVCSE-R3VBU-YHXFE-RX5T6
What’s New?
The interface is updated.
The mechanism of visual simple access drawing within the tape all the way.
Tape Gallery tool added.
New inset the “Create” are tools for dealing with the templates projects from Autodesk and Autodesk 360 cloud storage.
Accelerates your windows OS to get the latest updates.
XFORCE Keygen Full Crack is the Holocaust to activate all AutoCAD software.
Updated interface getting a for more dark background significantly decreasing the burden on the attention making all drawing elements.
Preview the instructions will let the user read all the procedures about the usage of this software.
Implemented models can import any supported file formats with auto-generation of documentation.
Xforce Keygen has added intelligent instruction with auto-correction.
Method Of Installation:
First, go to the official website and download the setup file from the link given below.
There are two ways to activate the setup file.
1st is to use serial keys.
2nd is Product Key for AutoCAD products.
You will get Xforce Keygen for Free.
Read the Instruction file and activate it.
Copy the generated Activation Code towards the related field of Autodesk’s activation windows and hit next twice.
For further assistance click on the help menu and get the help all the way.
Done! You have done.
System Requirements Xforce keymaker:
XForce Crack Recommended OS:
X Force Keygen For Autodesk 2013 Products 32 Bit Free Download Windows 7

Microsoft® Windows 7 SP1&SP2 with update KB4019990 (64 bits only)
BASIC processor: 2.4-2.9 GHz processor
Recommended: Processor 3 Plus GHz
Multiple processors: Yes
Basic Memory: 16 GB
Recommended: 32 GB!
Conclusion:
Therefore, the one and therefore, the only suggestion from our side to all or any the people that need to buy the paid versions of the games, you'll save tons of cash by simply installing the XFORCE Keygen. Most noteworthy from the above-given link and luxuriate in a lifetime free & unlimited use of a paid version of the software also games.
You May Also Like This:
NordVPN 2020 Crack MicroSD Card Recovery Pro DAEMON Tools Lite 2020 Crack EaseUS Data Recovery 2020 Crack Adobe After Effects 2020 Crack
0 notes
Text
HOW TO BYPASS ADMIN RESTRICTIONS WINDOWS 10
Windows 10 has different levels of user accounts for multiple users. The accessibility level is different for different user accounts. Standard users can modify their files except for modifying other user’s documents or preferences such as personalization, installing or uninstalling apps, and changing system settings.

However, as a standard user, you will sometimes need the admin rights to change system settings or install a new app. Most users access by disabling UAC settings or granting other users administrative authority. And none of the methods are safe.
We’ve researched and found the easiest, effective, and comparatively safe methods on how to bypass admin restrictions windows 10 here for you. Keep reading to learn about them.
Administrator Privileges and User Account Control
Different apps require a different set of permissions for proper functionality. Although some applications need no special permissions, some require admin privileges to add or modify logs, configs, or other system files.
When you install or run an app, the User Access Control dialog box pops up, asking for admin permission. UAC is a security feature of Windows 10 that controls how system files are modified. Unauthorized third-party apps can corrupt your system by injecting viruses, malware, adware, etc. UAC shields the network from unauthorized changes to the operating system.
Some of the Tasks that require admin permission:
Getting Windows Update
User accounts modification
App folder located in C:\Program Files (x86)\ or C:\WIndows\ directory.
Viewing or changing properties of other users.
Installing or uninstalling software
Task Scheduler
Windows Firewall
Family Safety or Parental Controls
Admin Restrictions on Standard User Accounts
Most apps modify your WIndows’ system files. Viruses or malware in unauthorized third-party apps corrupt the system files. Your privacy is highly vulnerable to them as well.
Admin restriction plays an essential role in protecting your entire system. Not only preventing unauthorized changes, but this feature also controls the way other users use your computer. The administrator account can control other user accounts in many ways, such as:
Network Access: Controlling the access or blockage of particular websites or IP addresses.
Installation and Uninstallation Process: Restriction on installing or uninstalling software.
Task Manager: Control on viewing or changing running processes.
Accessing system files or limitations on overall usage.
3 Easy Ways to Bypass Admin Restrictions on Windows 10
Run Apps by UAC Prompt Elevated
Asking for administrative permission every time you run an installed app can be bothersome. And, what if a password protects it? You can disable this prompt by typing a simple code, and you don’t have to change the UAC settings either.
Let’s consider an executable file available in both of our devices as a reference. The regedit.exe in the C:\Windows\ directory requires authorization every time you try to open it.
As the first step, open the notepad from the search box in the taskbar.
Write the following command line in your notepad:
cmd /min /C “set __COMPAT_LAYER=RUNASINVOKER && start “” %1″
Save the file as “Bypass Admin Restriction.bat” (yes, we’re saving it as BAT format!)
We will force run the EXE file (regedit.exe in this case) with UAC prompt elevated. Drag and drop the file on the newly created Bypass Admin Restriction.bat file.
Now you should be able to run apps without admin privilege. The UAC Virtualization column on the process tab under Task Manager also shows if the app is running without admin privileges. You can use it for any executable file.
Enable Built-in Administrator to Overwrite Access
Built-in Administrator is the default “hidden administrator” account created during Windows setup. It remains disabled by default. You can change the password or access any file by enabling this feature.
Type “lusmgr.msc” in the Task manager’s search bar to open the “Local Users and Groups” window. (You can go to Start>Control Panel>Administrative Tools>Computer Management>Local Users and Groups alternatively)
Click on “Users” on the left panel. You’ll see the user account list on the right side- open Administrator by double click.
Uncheck the “Account is disabled” option and save it by clicking Apply.
Now close all windows and login to your built-in Administrator account from the lock screen.
Now you can bypass admin restriction on your windows 10.
Changing Administrator Password
There are multiple ways to change administrative passwords on Windows 10. Here are the two easiest methods of unlocking your account fast:
Bypass Windows 10 Administrator Password in Safe Mode
Resetting the password by using safe mode is the oldest method. This method allows you to accomplish your goal without any external device. We’ll be overwriting two essential system files ‘cmd.exe and sethc.exe” here.
1. Force restart your computer by unplugging the power cord (desktop) or removing the battery (laptop). Repeat until you see “Preparing Automatic Repair”.
2. Your system will run a diagnosis. A new window titled “Advanced Options” will appear after the completion of the diagnosis.
3. At this stage, proceed to Advanced options>Troubleshoot>Command Prompt. In the command prompt, go to the system directory. Type “dir” to confirm if you’re in the system directory. If you’re not in the right directory, point to the system drive using the below codes:
cd\
cd windows\system32
4. Now make a backup copy of sethc.exe and then overwrite the existing sethc.exe with cmd.exe file using the codes written below:
copy sethc.exe sethc_copy.exe
copy /y cmd.exe sethc.exe
5. Restart your computer. When you see the user login window, press the Shift key 5 times repeatedly. Doing so will open a new command prompt window.
Type “net user” to see all user accounts. In this step, we’re going to change the administrator password. Type “net user [name of the user] [password]” to change the password.
6. Now, restart your computer and log in with the new password.
Note: You’ll lose access to all encrypted files after resetting the password the way we mentioned above. Confirm there’s no sensitive file encrypted under that account.
Bypass Admin Password Windows 10 via MSDaRT
Another effective way to recover your administrator password is using Microsoft Diagnostics and Recovery Toolset (MSDaRT). Wondering how to bypass admin restrictions on windows 10 using this toolset? Our easy guide will turn you into a Password Recovery Expert in the next 5 minutes.
1. Download MSDaRT from Microsoft’s website.
2. Burn the tool using a portable device (i.e., USB drive). Boot the computer using the DaRT drive. Click “No” on “NetStart prompt”.
3. Choose language. Load the Windows 10 operating system and move to the next step.
4. Click on “Microsoft Diagnostics and Recovery toolset” at the bottom of your recovery window.
5. Click on “Locksmith” under the DaRT tool. Then click next.
6. Now select your Administrator’s account and reset your password.
Restart and login to your user account with the fresh password.
Conclusion
We intended to share the easiest ways to bypass admin restrictions on Windows 10 with you for learning purposes. We do not recommend using any of these methods unless there is a serious necessity. Changing the natural process can affect the files stored inside your computer.
Microsoft also recommends keeping the built-in Administrator account disabled on the client computer for security. Enable Admin Approval Mode as well if you need to enable a built-in administrator account. Remembering the password or asking your administrator for approval is the best practice of all.
FAQs
Q: How do I bypass admin restrictions on Windows 10?
A: The administrator account has full control over the computer, such as blocking other users from various functions. However, you can escape these restrictions in multiple ways. Turning off the UAC prompts, getting admin privileges from built-in admin, or even breaking the passwords.
Q: Can I bypass admins privileges as a standard user by using startup repair only?
A: Yes, it is possible to bypass admin privileges as a standard user. Go to safe mode and select startup repair. Follow the instructions provided in this guide to elevate the restrictions successfully.
Q: How do I install programs without UAC prompts?
A: You can elevate the prompts from UAC settings. Go to Control Panel> User Accounts (small icons)> User Accounts Control Settings. A new window will open. Turn the slider all the way down to never notify. However, doing so will put your computer at risk of a security breach.
#how to bypass admin permission windows 10#how to bypass administrator privileges on windows 10#bypass admin permission windows 10#how to bypass administrator restrictions windows 10#how to bypass admin windows 10
0 notes